
The Patio Cover Installation Process in Los Angeles: What to Expect Step by Step
A patio cover is one of the most impactful investments a Los Angeles homeowner can make for their outdoor space — and also one of the more opaque processes for homeowners who have not been through it before. What does the installation actually involve? How long does it take? What happens with permits? What does the crew do first?
This guide walks through the patio cover installation process in Los Angeles from the very beginning to the finished outdoor room — step by step, clearly — so you know exactly what to expect when you commission a patio cover with a professional contractor.
Step 1: On-Site Consultation and Design
The patio cover installation process begins before any design is drawn or any material is ordered — with a genuine on-site consultation where the installer assesses the property and discusses the project with the homeowner.
During this visit, the installer evaluates the dimensions of the existing or planned patio area, the structure of the home's back wall or fascia where an attached cover will connect, the condition of any existing slab that the cover posts will sit on, and any site-specific conditions that affect the design or installation. They also discuss the homeowner's goals — the preferred style of cover, the desired level of shade, whether electrical for lighting and fans is wanted, and how the cover should relate to the home's architectural character.
From this consultation, a design is developed that specifies the exact dimensions, product or material type, attachment method, post locations, and electrical requirements of the patio cover.
Step 2: Permitting
For most patio cover installations in Los Angeles — including all attached covers and freestanding structures above certain size thresholds — a building permit is required before installation can begin.
The permit application is prepared by the installing contractor and includes drawings that document the cover's dimensions, structural details, attachment method, and compliance with setback requirements for the specific property. For prefabricated systems like Alumawood, manufacturer-provided structural engineering documents are typically submitted as part of the permit package. For custom wood structures, project-specific engineering calculations may be required.
The permit is submitted to the relevant building department — LADBS in the City of Los Angeles, or the building department of the specific municipality for properties in Beverly Hills, Santa Monica, or other independent cities. Plan check review and permit issuance timelines vary by jurisdiction — from same-day over-the-counter issuance for straightforward applications to two to six weeks for full plan check review. Your contractor communicates the expected timeline upfront and tracks the permit status through to issuance.
No structural installation work begins until the permit is in hand.
Step 3: Material Ordering and Job Scheduling
With the permit approved, materials are ordered. For prefabricated systems like Alumawood, components are ordered from the manufacturer to the specific dimensions of the approved design. Lead times for prefabricated patio cover components in Los Angeles are typically one to three weeks depending on product availability and order volume.
For custom wood patio covers, lumber and hardware are sourced to the specifications of the project design.
While materials are being sourced, the installation is scheduled with the homeowner — typically within one to two weeks of material availability.
Step 4: Site Preparation
On the day installation begins, the crew prepares the site for the structural work. For an attached patio cover, this includes confirming that the attachment point on the home's back wall or fascia is structurally sound and ready to receive the ledger board. Any surface preparation — cleaning the attachment area, removing obstructions, protecting the surrounding patio and vegetation — happens at this stage.
For patio covers with post footings poured into the existing concrete slab, the post locations are marked and core-drilled or jackhammered to allow the post anchor hardware to be properly embedded. This step requires precision — post spacing and alignment must match the approved drawings exactly.
Step 5: Ledger Board and Post Anchor Installation
For attached patio covers, a ledger board — the horizontal structural member that attaches to the home and carries the load of the cover's roof structure — is installed first. The ledger must be attached to the home's structural framing — not just the stucco or siding surface — to properly transfer the dead and live loads of the cover to the building structure. This connection must meet the specifications in the approved permit drawings and must be inspected before the cover structure is framed.
Post anchors are set in the slab at the locations specified in the approved drawings — either embedded in poured concrete footings within core-drilled holes in the existing slab, or attached to the slab surface using approved structural hardware where footing depth requirements allow.
Step 6: Framing and Structure Assembly
With the ledger and post anchors in place, the structural frame of the patio cover is assembled. For prefabricated aluminum systems like Alumawood, this involves assembling the manufacturer-provided components — posts, beams, rafters, and trim — according to the approved design and manufacturer installation instructions. For custom wood structures, this phase involves more extensive carpentry — cutting, fitting, and fastening the structural members to the specifications of the project design.
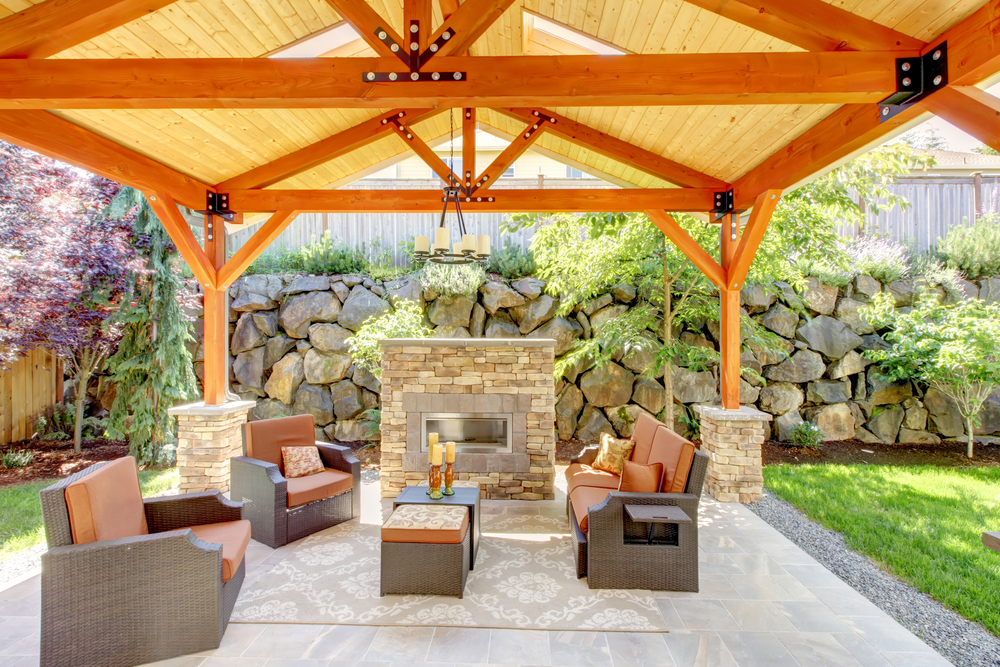
The framing is the most visually dramatic phase of the installation — the cover's shape and scale become clear for the first time as the structure takes form.
Step 7: Panel or Decking Installation
For insulated or solid aluminum panel covers, the roof panels are installed across the rafter structure in sequence — each panel interlocking with the adjacent ones and secured at the rafter connections. The result is a continuous, weatherproof roof surface that provides complete overhead coverage.
For custom wood covers, roof decking — tongue-and-groove boards, shiplap, or other specified material — is installed across the rafter structure. For open beam designs with no solid roof surface, this step is not applicable.
Step 8: Electrical Rough-In
If the patio cover includes electrical for ceiling fans and lighting, the electrical rough-in work happens after the structure is assembled and before any finishing trim is applied. Conduit is run through or along the cover structure to the locations of ceiling boxes — typically centered in the cover bay or at specified locations per the lighting plan. Junction boxes and mounting hardware are installed. The electrical rough-in is completed and inspected before the circuit is connected at the panel.
Electrical work is performed by or coordinated with a licensed electrician and inspected by the building department as part of the permit compliance process.
Step 9: Trim and Finishing
With the structural and electrical work complete, finishing trim is installed — fascia boards, end caps, post trim collars, and any other detail elements that give the cover its finished appearance. For Alumawood and aluminum systems, all trim components are part of the manufacturer system and are designed to integrate cleanly. For custom wood covers, trim carpentry is performed to the specifications of the project design.
The finishing phase is what transitions the cover from a structural assembly to a finished architectural feature.
Step 10: Building Inspection
For permitted patio cover installations in Los Angeles, the building department inspector visits the site to confirm that the completed installation matches the approved permit drawings and meets all applicable code requirements. The inspection covers the structural connections, post footings, electrical work, and any other elements specified in the permit.
Final inspection sign-off by the building department officially closes the permit and confirms that the work is legally compliant. This documentation is important for home sales and insurance purposes.
Step 11: Final Walkthrough and Light Fixture Installation
Following inspection sign-off, any remaining finish items are completed — light fixtures and ceiling fans are installed at the electrical boxes, final cleaning of the cover and patio surfaces is performed, and any minor touch-up items are addressed. The crew walks the completed installation with the homeowner, confirming that every element meets the agreed specifications and the client's expectations.
The outdoor room is now ready to use.
How Long Does Patio Cover Installation Take in Los Angeles?
For a standard residential Alumawood or insulated aluminum patio cover installation over an existing concrete patio, the active construction phase typically takes one to three days depending on the size of the structure and the electrical scope. Custom wood patio covers typically take three to seven days of active carpentry. Permitting time — which precedes construction — adds two to six weeks depending on the jurisdiction.
Stonewood Landscape: Professional Patio Cover Installation Across Los Angeles
Stonewood Landscape installs patio covers for homeowners throughout Los Angeles, including Culver City, Santa Monica, Beverly Hills, Encino, and Pacific Palisades. As a family-owned landscape design and construction company with over 10 years of experience and more than 500 completed projects, Stonewood manages the complete patio cover installation process — from permit application through final inspection — with the professionalism and quality that every Los Angeles homeowner deserves.

The right patio cover transforms your outdoor space. The right process gets it done correctly, legally, and beautifully. Stonewood Landscape delivers both.
Visit stonewoodlandscapeinc.com to request your free estimate and start your patio cover installation today.


